
I’m a Product Manager on GKE, and I spend a lot of my time with platform teams who are tired of the node pool tax. You sit down to “just run a workload,” and somehow you’re back in the console hand-crafting a node pool: pick a machine type, set min and max, decide on Spot or on-demand, wire up taints and labels, and pray you guessed the shape right. Then traffic changes, or that machine family runs out of capacity in your zone, and you’re back doing it again.
Node pools are inventory you pre-order. You commit to a specific shape up front and hope demand matches. ComputeClasses flip that model. Instead of pre-ordering fixed inventory, you hand GKE a prioritized shopping list — “give me N4 Spot if you can, fall back to N4 on-demand if you can’t” — and let the platform provision against your intent.
This is the first in a series. Today is the primer: what ComputeClasses are, the major features, a hands-on walkthrough you can run yourself, how they compare to Karpenter, and the patterns you’ll actually reach for.
A platform-level abstraction#
Platform engineers: a ComputeClass is a platform-level abstraction that gives you autonomous control over node provisioning. You define the menu of node intents once; your app teams just point at it.
That separation of concerns is the whole point:
- Platform team owns the ComputeClasses — which machine families, Spot vs on-demand, fallback order, reservations, consolidation behavior. This is where your capacity strategy and cost guardrails live.
- App teams opt a workload in with a single node selector, or get one by default from a cluster- or namespace-scoped default ComputeClass. They don’t need to know anything about machine types or capacity.

A ComputeClass is a custom resource — a cluster-scoped object you apply with kubectl like any other manifest. It declares, in priority order, the kinds of nodes GKE should create and use.
Two things make it click:
- It’s intent-based. You describe the shape you want (
machineFamily: n4, Spot or not), not a specific node pool you’ve pre-built. GKE figures out the rest. - It’s a fallback list, not a single choice. You give an ordered set of priorities. GKE tries the first; if that capacity isn’t available, it falls through to the next. Graceful degradation across capacity types and machine families, without you babysitting it.
Works with what you already have#
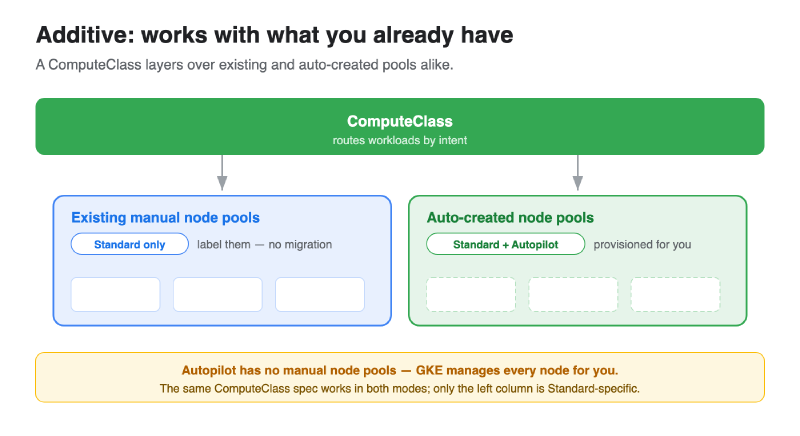
Before the walkthrough, the most important adoption fact: ComputeClasses are additive. You don’t rip anything out to start.
- They work with your existing, manually-created node pools. A ComputeClass can route workloads onto node pools you already manage — just label the pool and reference it. No migration required.
- They work with auto-created node pools. Turn on
nodePoolAutoCreationand the ComputeClass provisions pools scoped to itself, on demand. This greatly improves your obtainability, since you don’t have to pre-create node pools to serve demand. - They work in both GKE Standard and Autopilot. Same abstraction, both modes.
So you can adopt incrementally: start by pointing one ComputeClass at the node pools you already run, then let auto-creation take over more of the fleet as you get comfortable.
A hands-on walkthrough#
Let’s actually deploy one. You’ll need a GKE cluster on 1.33.3-gke.1136000 or later (for nodePoolAutoCreation).
1. Define the ComputeClass#
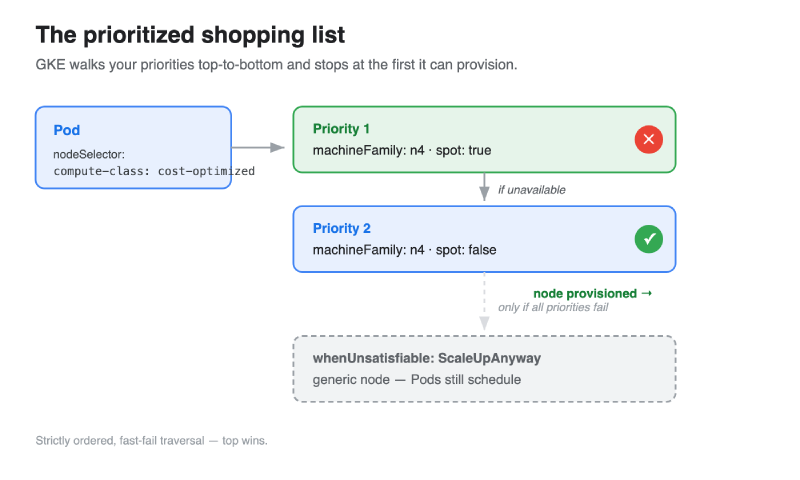
Save this as cost-optimized-cc.yaml. Read it top-to-bottom — that order is the priority:
| |
In English: try N4 Spot first. If Spot capacity isn’t available, fall back to N4 on-demand. Create node pools automatically as needed, consolidate underused nodes after 5 minutes, and if neither priority can be satisfied, fall back to a generic node rather than leaving Pods pending.
One thing worth saying early, because it drives your bill: consider matching the machine family you pick to your existing Committed Use Discounts (CUDs) or Reservations. The n4 above is only an example.
Apply it:
| |
2. Opt a workload in#
Save this as demo-deploy.yaml. The only special line is the nodeSelector:
| |
Deploy it and watch GKE provision against your intent:
| |
That’s the entire opt-in surface for an app team: one nodeSelector line.
3. (Optional) Point it at an existing manual pool#
To prove the “works with what you already have” claim, you can make the same selector schedule onto a node pool you created by hand. Label your existing pool’s nodes with the compute-class label, and Pods selecting cost-optimized will schedule there too — no auto-creation involved:
| |
4. Clean up#
| |
The stanzas worth knowing#
A few sections of the spec carry most of the weight.
priorities[] — the ordered fallback list#
The heart of it. Each entry describes a node shape — machineFamily, spot: true/false, optionally a reservation or machine type. Order is everything: top wins, and traversal is strictly ordered. GKE tries priority 1, and only moves to priority 2 if 1 can’t be provisioned.
If you want a tie-break tier rather than a strict order — “any of these, whichever is cheapest right now” — there’s priorityScore. Priorities sharing a score are treated as one tier and resolved by lowest unit cost.
nodePoolAutoCreation#
| |
Starting in GKE 1.33.3-gke.1136000, setting nodePoolAutoCreation.enabled: true lets the ComputeClass create node pools scoped directly to itself, on demand. A nice simplification: you don’t need to turn on cluster-level Node Auto Provisioning to use it. The ComputeClass is self-contained.
autoscalingPolicy#
Where you tune scale-down behavior. The one you’ll use most is consolidationDelayMinutes — how long an underused node waits before the autoscaler reclaims it (floor: one minute). Lower means tighter bin-packing and lower cost; higher means fewer disruptions.
whenUnsatisfiable#
What happens when none of your priorities can be provisioned. Two values: ScaleUpAnyway (fall back to a generic node so Pods schedule) or DoNotScaleUp (leave Pods Pending).
activeMigration#
By default, editing a ComputeClass does not move existing workloads onto newly-available higher-priority nodes. If you want that drift behavior — “Spot capacity came back, move me off the expensive on-demand node” — you opt in with activeMigration.
A note on disruption: today, you manage the disruption from consolidation and migration with standard Kubernetes PodDisruptionBudgets on your deployments. We’re also building a new workload-level disruption control system designed to pair with ComputeClasses — a more expressive way to govern how and when CC-driven changes touch your workloads. More on that as it lands.
Why ComputeClasses, if you know Karpenter#
If you’ve run Karpenter on EKS, the mental model maps cleanly:
| Karpenter | GKE ComputeClass |
|---|---|
NodePool | A ComputeClass (collapse several into one priorities[] list) |
spec.weight | Order in priorities[] (top wins) |
capacity-type: spot | spot: true on a priority |
consolidateAfter: 30s | consolidationDelayMinutes (floor: 1 minute) |
drift | activeMigration |
And the instance families translate about how you’d guess:
- General purpose:
m5/m6i→n2/n4 - Compute optimized:
c5/c6i→c2/c4 - AMD:
m5a/m6a→n2d/n4d - ARM:
c7g/m7g→c4a/n4a
Where ComputeClasses genuinely differentiate:
- No controller to run. CC is built into the GKE control plane. Karpenter is an add-on you install, upgrade, operate, and grant broad cloud IAM to provision nodes. With CC there’s no controller to keep alive, no version skew, no provisioning permissions to hand out — it’s just part of GKE.
- Additive to your existing fleet. Karpenter manages only the nodes it created. A ComputeClass layers over your existing manual node pools and auto-created ones, so adoption is incremental rather than rip-and-replace.
- One abstraction across Standard and Autopilot. The same ComputeClass works in both GKE modes — you don’t relearn anything when you move between them.
- Deterministic, ordered fallback. Karpenter weighs a flexible set of instance types and bin-packs across them. CC walks your list in strict order and falls to the next priority the instant one fails. That predictability is exactly what you want when you need “reservations first, Spot only as a last resort” to actually mean it.
- Native GCP capacity awareness. Reservations, DWS FlexStart, and CUD-aligned families are expressed directly in the spec, so your provisioning intent and your commitments stay in sync.
Patterns you’ll actually use#
Cost-optimized, Spot-first (batch and stateless serving). The walkthrough example. Spot priority on top, on-demand floor underneath. The bread-and-butter pattern and the easiest win on your bill.
AI/ML inference — order reservations first. For inference, lead with guaranteed, warm capacity rather than Spot: accelerator nodes are slow to start, and Spot preemption mid-serving hurts latency and availability. Consider something like:
Reservations → On-Demand → DWS FlexStart → Spot
Intent-based sizing to avoid pool sprawl. Prefer machineFamily: n4 over pinning an exact SKU. Pinned classes multiply node pools; expressing intent lets GKE consolidate shapes and keeps your pool count sane.
A namespace default. You can designate a default ComputeClass for a namespace so teams don’t have to annotate every workload — handy for routing an entire environment onto a sensible cost profile by default.
Next time#
That’s the lay of the land: a platform-level, intent-based fallback list that provisions nodes against what you actually want — additive to your existing pools, working across Standard and Autopilot, with graceful degradation across capacity types. Stay tuned for more in this series, including our community plans for ComputeClasses.