Easy Kubernetes Development With Skaffold

[Cover Image: my old FJ60]
Until recently, I drove an old 80s FJ60 Land Cruiser. Cool, you say? Yes, it was. It was also a lot of work. I did most of that work myself including a carburetor rebuild, head rebuild, radiator, knuckle rebuild, brakes, wiring - you name it. And I learned an awful lot in that process; not just about the Land Cruiser but also about cars, their maintenance, and the tools involved. There was joy, there were tears, too.

But when it came down to it, I was investing too much time for the return I was getting. So I threw in the towel and sold the Cruiser for a new car. I know, it’s a shame, but there’s also glorious relief in just having something that works without all the effort.
Fast forward to today and I’m staring down the barrel of learning app dev with Kubernetes. Do I take the long way around again? Do I have the time to do that? Is there even an easy way?
Keep in mind that I’m newly on the Kubernetes dev journey. I’m posting in the spirit of learning in public and to help others starting their journey. Kubernetes is a super deep pool and this post is NOT about administration or configuration. My priorities are as follows:
1- Get a dev loop up and running for purposes of local app iteration.
2- Move from local iteration to remote cluster deployment as easily and confidently as possible.
By easily I mean not having to change a bunch of config files. And by confidently, I mean confidence that my inner loop has reasonable parity with my remote cluster. IOW, I don’t want big surprises when I deploy to “production”.
Working for Google Cloud admittedly has some perks. Like access to some of the best Kubernetes mentors around. People like Vic Iglesias, who helped me bootstrap, so I’m paying it forward here. I’m still learning so I invite your comments and suggestions.
Dev Loop challenges
My first pain point in moving to kubernetes, as noted above, is simply getting a dev inner loop going so that I can iterate my app locally with minimum pain. I have a few options:
1- Run my app using the language runtime via command line or IDE buttons.
$ python my-app.py
The severe downside with this approach is that I’m not assessing my app in a container while iterating, much less kubernetes. How do I know if my app or dependencies will work in prod?
2- Docker build and run (assuming a Dockerfile)
$ docker build -t my-app . && docker run --rm -p 8080:8080 -e PORT=8080 my-app
This works, and this is how I used to do it. The problem here is that while I’m in a container, I’m not trying my work in k8s. Which means I’m still relying on some downstream CI process to truly exercise my code in a prod-like k8s cluster. Not ideal.
3- Manually deploy to Minikube
Minikube is a local k8s environment. But this can be… onerous:
- Build the image
- Push the image
- Run
kubectl apply(or use helm or kustomize if you have hydrations) - Wait for my app to deploy, which means periodically checking in using
kubectl get servicesuntil I get the green light - Copy the IP address from
kubectl get servicesto assess in my browser.
Make another change, repeat these steps…
This solves problems in 1 and 2 above, but I’m spending a lot of time and energy building and deploying to my local k8s cluster. All that task switching will take me out of the “flow”. Plus, how do I reconfigure for remote clusters easily?
There has to be a better way.
Make it easy
Skaffold is a client-side command line utility (with GUI via Cloud Code) that abstracts away all of the painful stuff above and gives you “hot reload” style workflow where changes saved in your IDE automatically trigger a redeploy for you. And if you don’t have compiled components, modified files can be sync’d directly into your running images sparing a rebuild of the container.
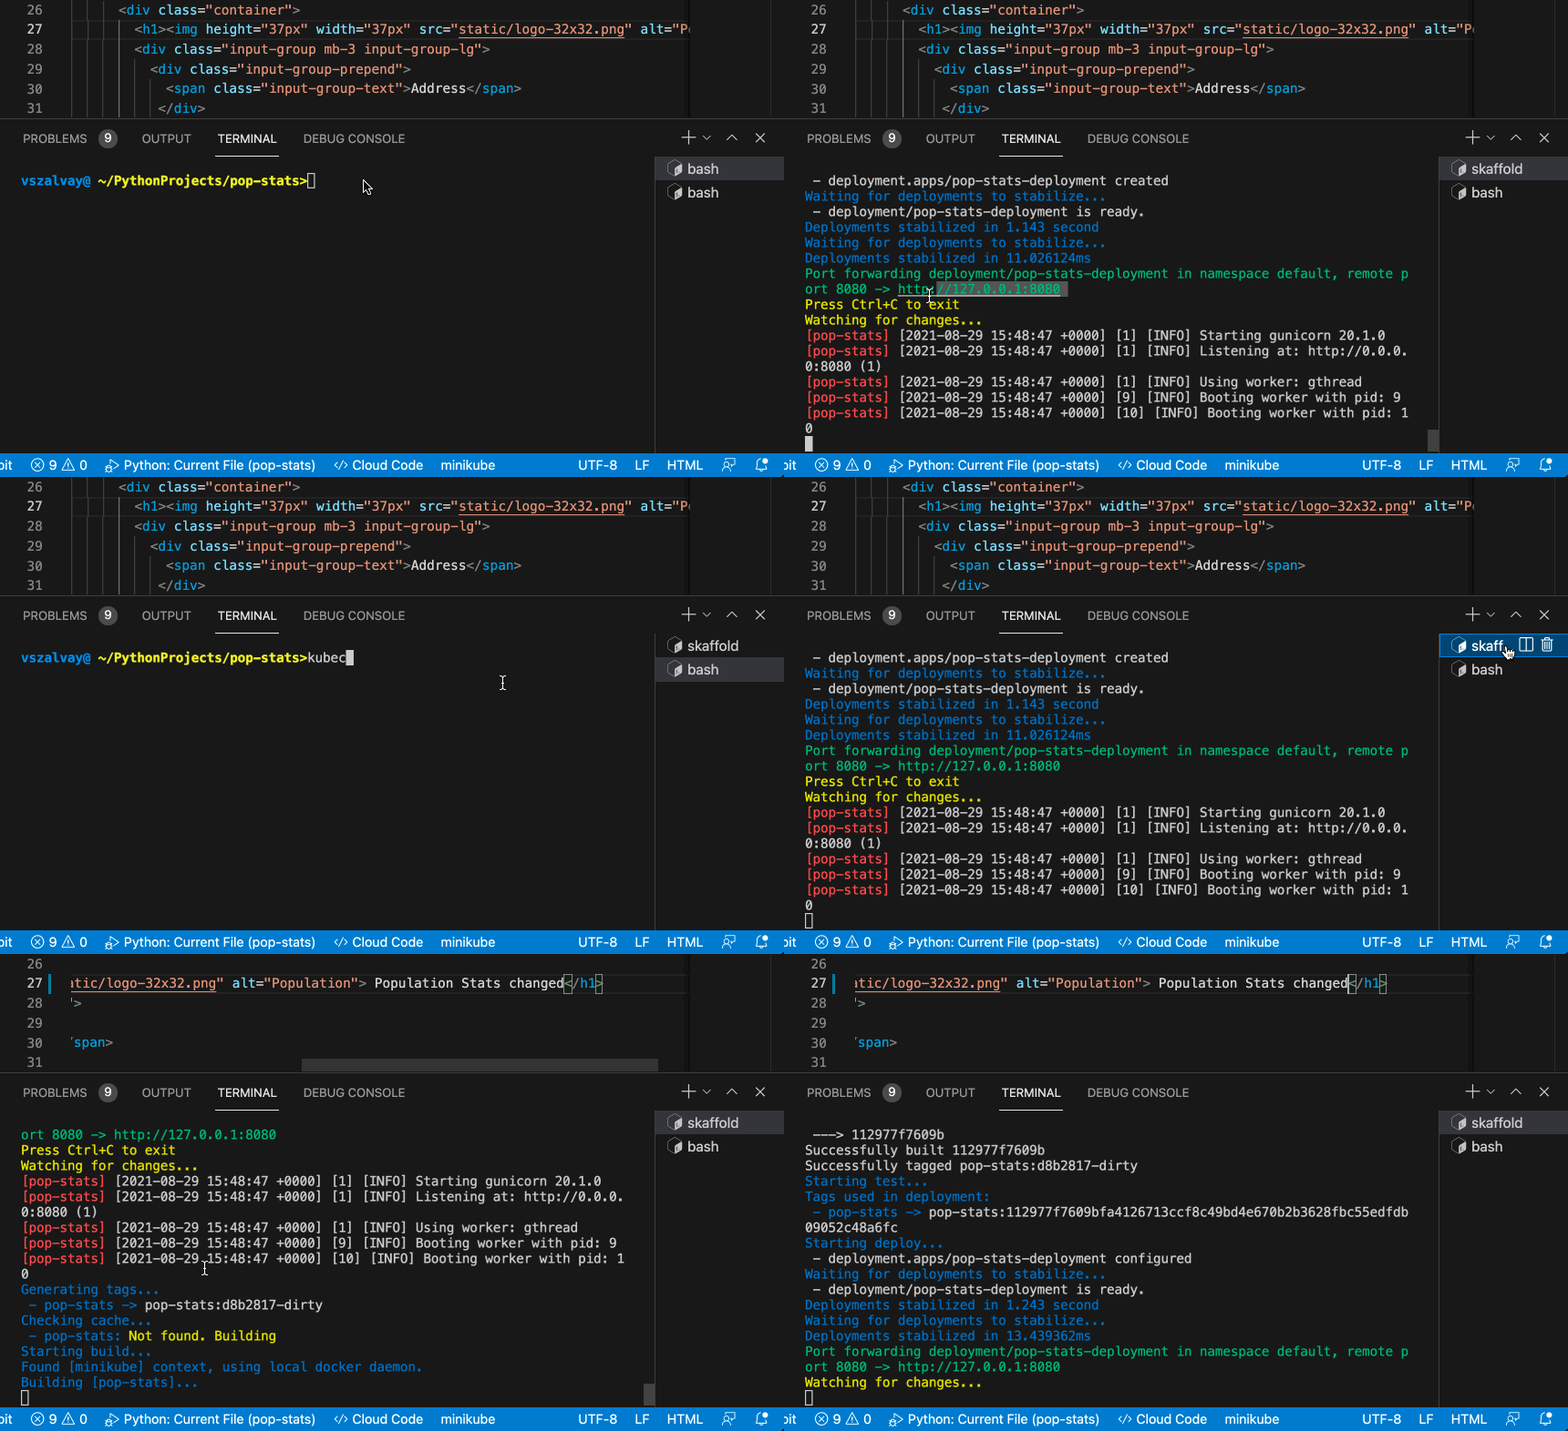
Bottom line, I get a real kubernetes development loop with one command:
$ skaffold dev

My app is continuously updated and ready to assess in minikube until I stop the Skaffold process. I also have port forwarding set up for me.
Notice toward the end when I made a change to a template file? Skaffold picked up my change instantly and rebuilt my image without a pause in the action! This means I can leave skaffold dev running and focus on my application dev and assess my work product in kubernetes any time I want without lifting a finger.

Sample app
Let’s get you up and running with this dev inner loop. The easiest way to do this is using an established sample app and the Cloud Shell IDE, which includes all of the dependencies we’ll need– Minikube, Cloud Code, Skaffold. Cloud Shell is available at no charge, although a Google account is required.
My sample app is a simple single container Python Flask app called “Population Stats”. Click the button below to clone my repo into the Cloud Shell IDE:
Start your (kubernetes) engines
Let’s get our “local kubernetes” environment started in Cloud Shell:
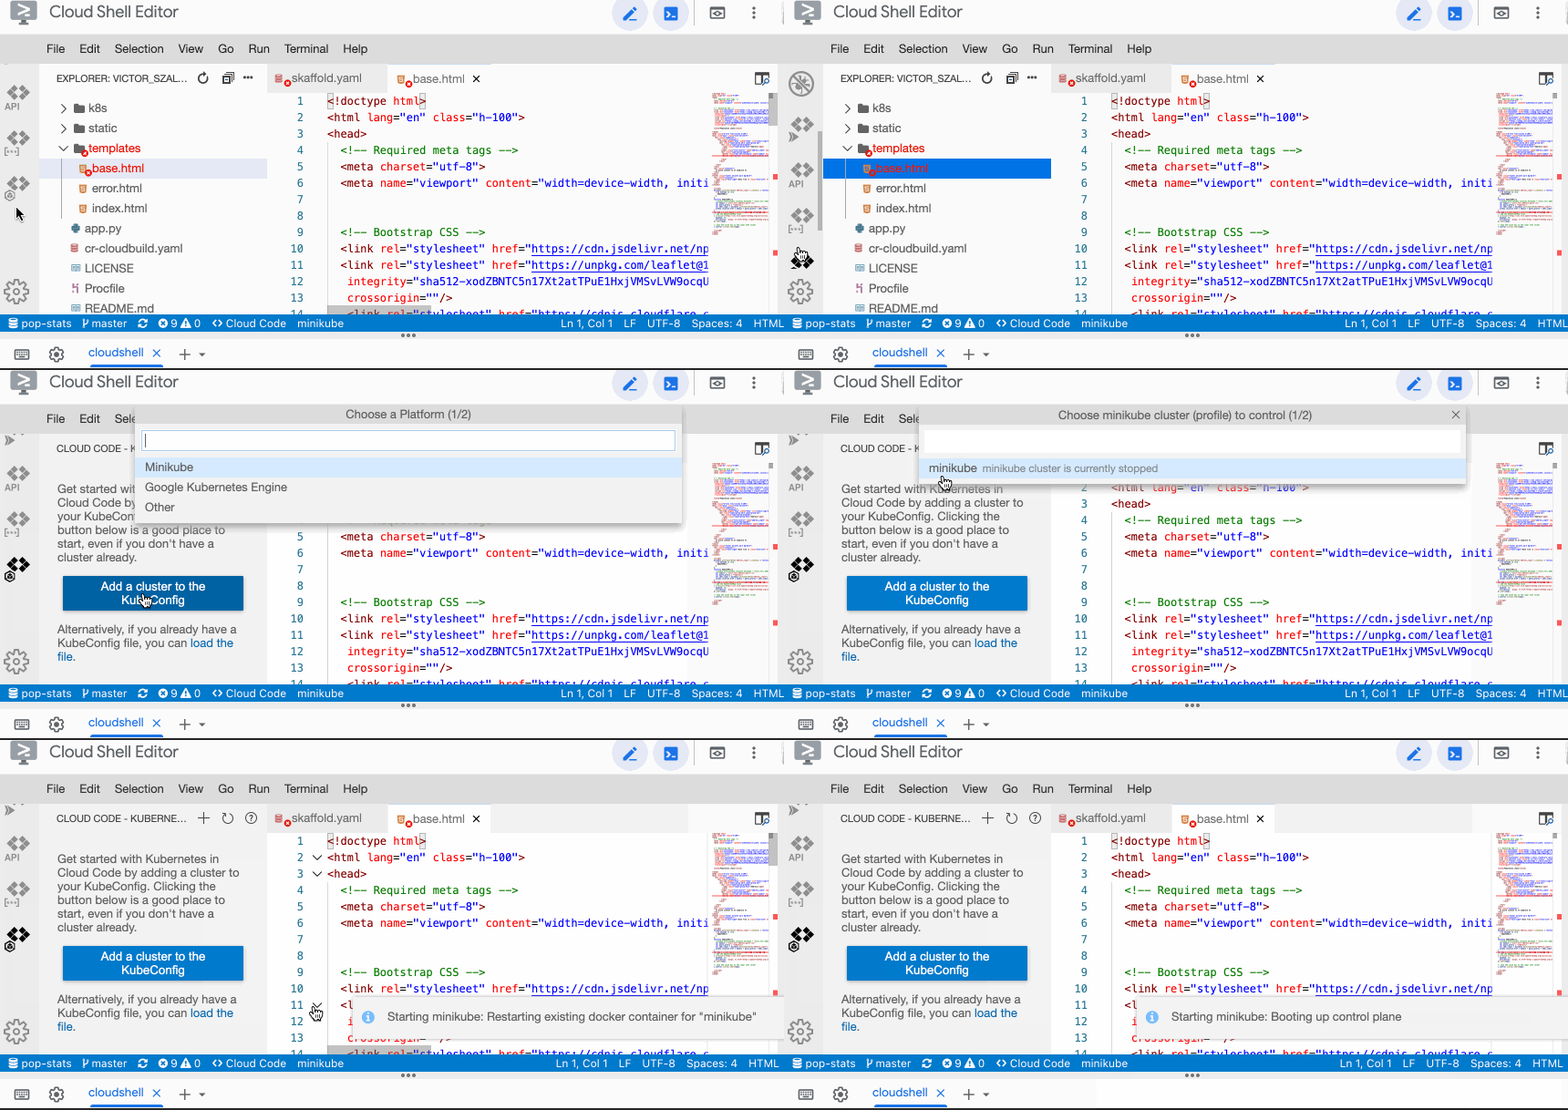
In the Cloud Shell IDE, activate the “Cloud Code Kubernetes” pane and then click “Add a Cluster…” to start a new cluster.
Select Minikube and start

Make sure minikube is the ACTIVE kubernetes context before continuing to the next step.
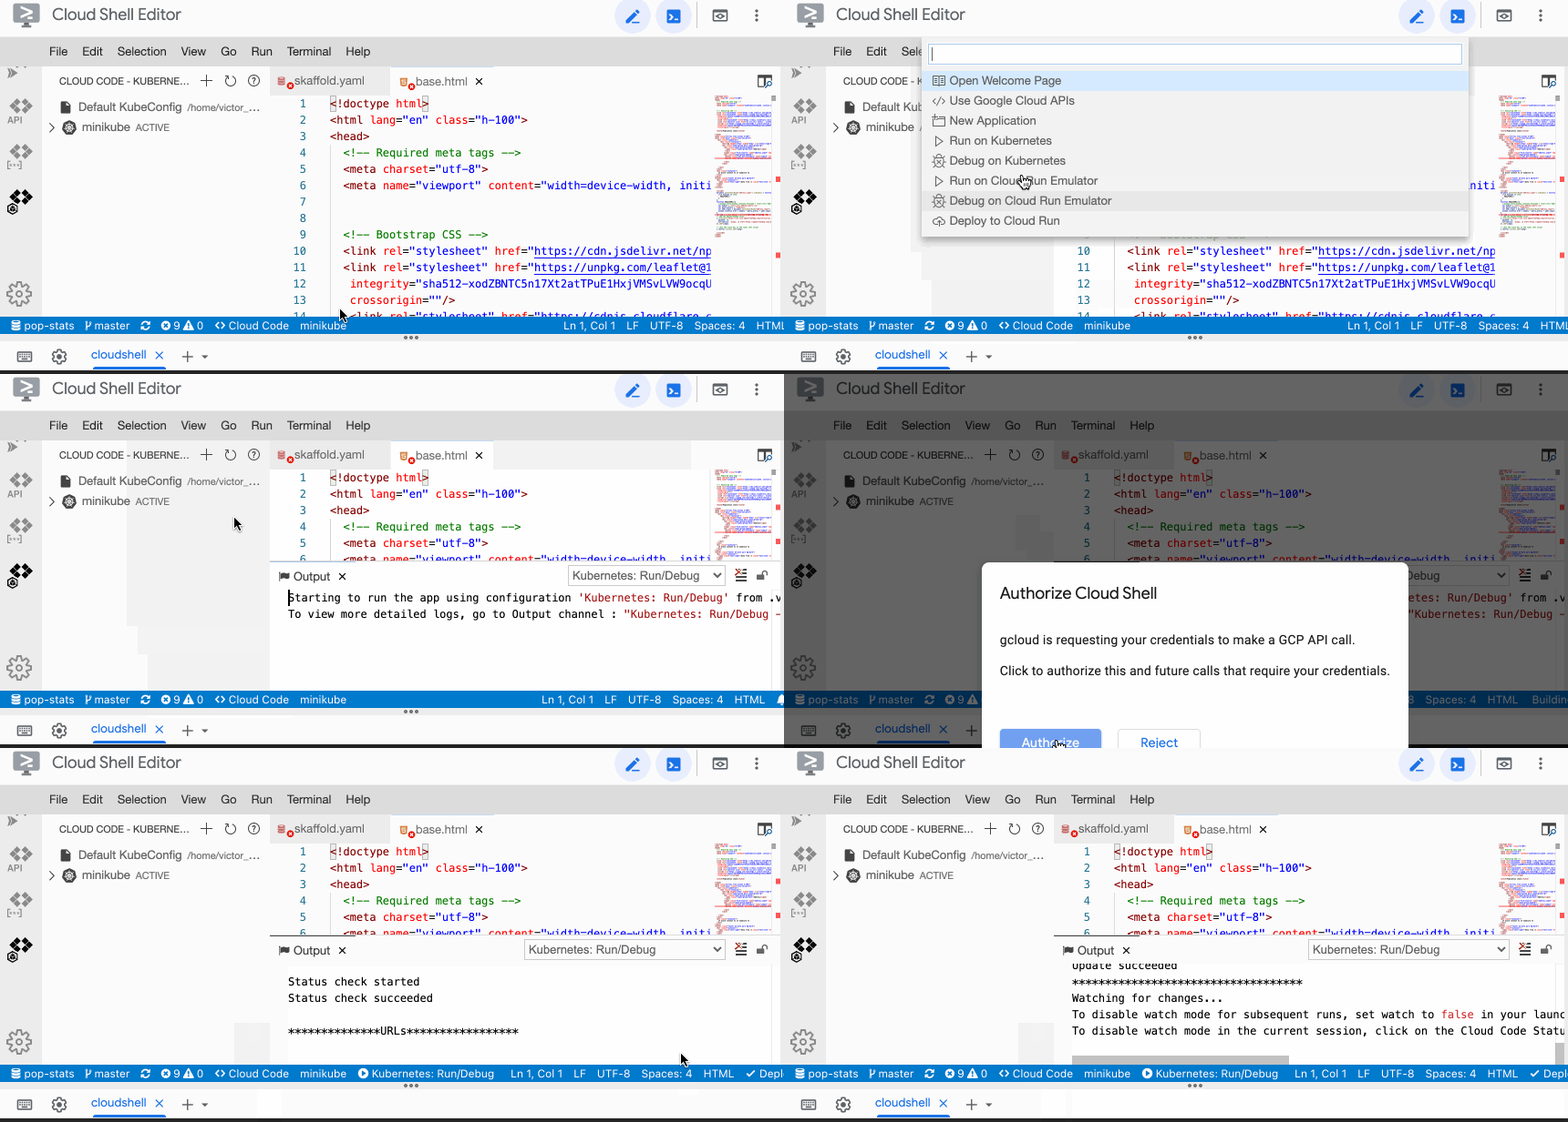
Cloud Code - Run on Kubernetes
Click Cloud Code menu at the bottom > Run on Kubernetes. Select [default] when prompted.

Or (if you’re a CLI person) in the terminal type:
$ skaffold dev
You should now see Cloud Code (skaffold under the covers) fetching base images, building the app’s container, and deploying to minikube.
Look for the forwarded port at the bottom of the output. Hover over the forwarded URL and click “Open Web preview” link (since we’re in Cloud Code, the local link is being proxied). You should see the Population Stats app. Viola!
Now let’s make a change to the app. You should see templates > base.html open in your editor.
Make a noticable text change to the base template, like the header text (line 27).
| |
Notice that immediately in your terminal/output area Skaffold has already picked up the change! Once the output settles down, refresh the preview URL and be amazed when your change is there, ready to assess.
Once you’re done playing around, you can stop Skaffold command line with Ctrl-C (or hit the stop button if you’re going GUI).
Your app
OK, so my app is a sample and you want to get this working for your app. Let’s dig deeper. You’ve got your IDE, an app, maybe a Dockerfile kicking around.
You only really need to install two things:
- A VM environment like Docker Desktop
- Cloud Code, an IDE plug-in which provides GUI interfaces to everything I’m going to show plus bundles all of the other needed dependencies: Skaffold, minikube, and kubectl.
Check out the steps in these tutorials to get you and going, then we’ll loop back and break down some skaffold configuration basics below.
Starting a brand new app - VS Code, Intellij IDE
Using an existing app - VS Code, Intellij IDE
Skaffold config breakdown
Don’t worry if your first attempt at skaffold dev doesn’t go as planned. Skaffold does a good job trying to guess at your app’s setup when instantiated (skaffold init), but sometimes a little hand-wiring may be required. Yes, that means editing some yaml. You’ll survive it.
The Skaffold.dev site has an exhaustive reference, but for now, I’m going to give you some basic config to hopefully get you up and running. If you’re k8s savvy, you’ll recognize the KRM style format. To get your dev loop, you’ll want to configure two stanzas: build and deploy
| |
Let’s break these down.
Build
In the build stanza, jump to the artifacts section, this is where I define the container(s) I’m building and reference my context and the Dockerfile I’m using (see Skaffold docs on buildpacks if you’re using those).
The local > push: false section simply tells skaffold not to try to push to a remote artifact repo. I use this since I’m developing locally by default, but it’s not required.
Deploy
The deploy stanza is pretty self-explanatory. We’re using kubectl to deploy, and we’re pointing to manifests. BTW, by default Skaffold looks for manifests in k8s/*.yaml, so you can omit this line if you put them there. Check out skaffold docs if you’re using helm or kustomize.
Port forwarding
This can be done manually by adding the port-forward flag to your skaffold dev command:
skaffold dev --port-forward
Or you can save yourself the trouble and add a portForward stanza to your skaffold.yaml right under the deploy stanza:
| |
You’ll need to crack open your kubernetes config for this service and find the Deployment config and grab the name value.
Save your skaffold.yaml file and re-run skaffold dev.
That’s it. You’re in business. When you save your application files, skaffold will rebuild and deploy for you so that you can stay heads-down on code. Check out the file sync options to speed things up even more.
Next steps
At the beginning of this post I talked about a second priority which is easily deploying to a remote cluster after iterating in my dev loop. I’ll cover that in an upcoming post, so stay tuned. In the meantime, check out the Skaffold examples. Cloud Code and Skaffold have certainly become my go-to for k8s dev. Hope you also find them useful!

